Sunday, November 20, 2011

Winter Squash Pizza Bake


Sliding in at the end of Orange Skies week at I Heart Cooking Clubs with this Winter Squash Pizza Bake.  For Orange Skies week we were to use an orange fruit or vegetable recipe, and I've had my eye on the recipe for Winter Squash Pizza in Tessa's book Apples for Jam since I first flipped through it a few months ago.  I love squash and pizza and this recipe just plain old sounded good to me. 

Winter Squash Pizza
Tessa Kiros -- Apples for Jam, page 82

1/2 small winter squash (I used a butternut squash)
salt
5 to 8 tablespoons olive oil
1 cup all purpose flour, for dusting -- I only needed about 1/2 cup
1 - 8 ounce can tomato sauce
1 to 2 teaspoons dried oregano -- I used an Italian seasoning spice blend that included oregano
1 cup grated mozzarella cheese

Peet the winter squash, cut out the seeds and cute the flesh into very thin long slices about 1/16 inch thick. Put the slices in a colander; sprinkle with salt and leave for about 1 hour. Rinse them very well and pat them dry. Preheat oven to 350.


Drizzle 2 and 1/2 tablespoons of olive oil into a round 10 or 12 inch baking pan (I used a 10 inch springform pan) and spread it to coat the bottom of the pan. Put the flour on a plate and pat both sides of the squash slices in it. Make a slightly overlapping layer of slices in the baking pan. Trickle the tiniest bit of olive oil over this layer; then repeat the layering and oiling until you have used up all the squash -- you should have four or five layers.


Mix a little salt into the tomato sauce (taste first and make sure extra salt is needed!) and dot here and there over the top of the squash.  Put into the oven and bake for about 50 minutes, until the bottom is sizzling and the top is turning quite golden. Scatter the oregano over the top, crushing it between your fingers.


Sprinkle with the mozzarella and return to the oven for 5 or 10 minutes, until the cheese melts and browns slightly.  I broiled for a touch at the end to brown the cheese.


Cool a little before serving in wedges like pizza.   


I thought this was pretty good.  I'm not quite sure about the "wedges like pizza" because the squash was very thoroughly cooked (meaning mushy, as squash gets) by the end of the 60 minutes in the oven.  The edges were a little crispy with the cheese, but this was more of a scoop and use a fork kind of dish.  I thought this would have been great served with some crusty bread to serve this on. 

Although I enjoyed this, my kids were not convinced and only had one bite each, the in-house required bite to try something new to see if they like it, and they all apparently didn't...my kids are on an anti-squash kick lately and I'm not sure why since I love all kinds of squash.  Maybe picky daddy's tastes are rubbing off (he is an avid squash hater).   I would say if you love pizza and love squash, as I do, give this a go, but if you are on the fence and don't like the texture of squash maybe this isn't the one to turn you into a squash lover.   I'm glad I tried it and could see making it again if I had some extra squash to use up, I would just be prepared to make a seperate dinner for everyone else :)


Wednesday, November 9, 2011

Banana Hazelnut Bread


This recipe is my pick for I Heart Cooking Clubs November Potluck. We love banana bread at our house and I am always up for trying a new recipe even though we have a favorite. I had some extra bananas on their way out so I figured I'd give Tessa's Banana Bread recipe a try and add some hazelnuts, as were suggested in the recipe preface...

Banana Hazelnut Bread
Tessa Kiros -- Apples for Jam page 349

1/4 pound plus 1 tablespoon butter
1 cup firmly packed dark brown sugar
3 or 4 medium ripe bananas, mashed -- I used 3
1 teaspoon vanilla extract
1 teaspoon ground cinnamon
pinch of salt
2 cups all purpose flour
1 teaspoon baking powder
3/4 teaspoon baking soda
4 tablespoons warm milk
approx 1/2 cup chopped hazelnuts (optional of course, if you are not a nut fan)

Preheat the oven to 350 and butter a 12 by 4 inch loaf pan. I do not have a 12 by 4 inch loaf pan but recently purchased this Kaiser 10 by 4 inch loaf pan so gave it a try with this recipe and it worked perfectly.


Cream the butter and sugar until smooth and then whisk in the mashed bananas. Add the eggs, vanilla, cinnamon, and a pinch of salt and whisk in well. Sieve in the flour and baking powder and beat until smooth. Mix the baking soda into the milk and stir into the batter. Stir in nuts if using.


Scrape the mixture into the pan...


and bake for about 50 minutes, until the bread is crusty on the top and a skewer poked into the middle comes out clean. Turn out onto a rack to cool. Serve warm or cold, plain or toasted with butter, but allow to cool completely before storing in an airtight container, where it will keep well for several days. I doubt it was last that long, our loaf didn't :)


I thought that this was a delicious version of banana bread that I wouldn't hesitate to make again.  It's nice for me to think of humble homey banana bread, a family favorite, being baked in kitchens around the world.  I personally loved the hazelnuts in the bread, but picky husband picked them out, sorry honey! Anyway, the kids liked this one as much as I did, so it was a winner in my book :)

Friday, November 4, 2011

Chinese Restaurant Style Sesame Tofu


This is one of my very favorite tofu dishes. I love Chinese restaurant style fried tofu, and this recipe is even better than any restaurant tofu I've had. I found the recipe a few years ago and have used it many times. It takes a long time to prepare and is quite a bit of work, but it is easy, and in the end - all the work is worth it, in my opinion :)


The original recipe is for chicken, if you eat/like chicken, I bet it is fabulous! I swapped out the chicken for tofu and the first time I made this. I didn't really know what to expect, which is usually the case while trying to swap the meat out of a recipe for, and this was such a delicious surprise when it turned out. My only change to the recipe (other than swapping out the meat of course) is to dredge the marinated tofu pieces in cornstarch before frying. Here is a recipe I've posted previously that has more in depth directions if you are new to frying tofu: Sweet and Sour Crispy Tofu.


Chinese Restaurant Style Sesame Tofu
adapted from this recipe @ food.com
this will make about moderate 4 servings, I usually double it

1 - standard size block of extra firm tofu (I like Mori-Nu brand) cut into approximate 1/2 inch cubes, does not have to be neat or fancy, small triangles also work well

Marinade:

2 tablespoons light soy sauce
1 tablespoon cooking wine or 1 tablespoon dry sherry
3 drops sesame oil
2 tablespoons flour
2 tablespoons cornstarch
2 tablespoons water
1/4 teaspoon baking powder
1/4 teaspoon baking soda
1 teaspoon vegetable oil

2 cups cornstarch (for dredging the marinated tofu)

Sauce:
1/2 cup water
1 cup vegetable broth
1/4 vinegar (you can use white, apple cider, or rice vinegar, they all work nicely)
1/4 cup cornstarch
1 cup sugar (white or brown, brown makes a nicer, darker sauce, I think, but I've tried both and they both work fine)
2 tablespoons dark soy sauce
2 tablespoons sesame oil
1 teaspoon chili paste or sauce like sriracha (more if you like spicy, less if you are serving to kids, like only 1/4 tsp)
1/4 teaspoon garlic powder

Oil for frying
Sesame Seeds for sprinkling on top
Rice to serve with (I like jasmine or jasmati)

Mix the marinade ingredients (the first 9 ingredients listed) and marinate the tofu for 20 minutes. I like to use a shallow pan, the tofu is very fragile after marinating so you have to be gentle.

Whisk together all of the sauce ingredients. Pour them into a small pot and bring to a boil, stirring continuously. Turn the heat down to low, stirring occasionally, and keep warm while you are deep-frying the tofu.


Dredge the tofu in cornstarch, giving a nice thick coating, be gentle so the tofu don't break apart.
Add the coated tofu pieces a few at a time into your frying vessel (I like to deep fry in my electric skillet, so easy and you can add lots of tofu pieces at a time) and deep-fry until golden brown (about 2 minutes). Remove with slotted spoon. Drain on paper towels and then place tofu in warm oven (130 degrees) while you continue frying. Repeat with the remainder of the tofu. Just before you are finished deep-frying, bring the sauce back up to a boil.


To serve, put the tofu over a bowl of rice, spoon over some sauce, enough to coat the tofu and a little extra to flavor the rice. Sprinkle on sesame seeds and enjoy! It is important to not mix the tofu with the sauce until you are serving this because the tofu will get soggy quickly and tastes much better crispy crunchy.


If you give this a try I hope you enjoy it as much as we do! This is a favorite of my middle son, and my daughter who usually does not like tofu at all likes this dish, my youngest likes it as well. Go light on the chili paste if you are serving this to kids. Happy cooking!


Thursday, November 3, 2011

Sautéed Tomatoes in Olive Oil and Rosemary over Mafaldine Pasta


Over at I Heart Cooking Clubs the theme of the week is: In My Pasta Bowl... and in my pasta bowl there was a delicious mingling of flavors with Tessa Kiros recipe for Sautéed Tomatoes in Olive Oil and Rosemary (from her book Apples for Jam on page 46) served over mafaldine pasta. Mafaldine pasta noodles are long and thin mini ruffled lasagna type noodles that are just perfect for sopping up juicy sauces, they are one of my favorite pasta shapes and the kids love them too.


The tomatoes I used in this recipe are extra special since they are from my husband's grandmother's farm and were her last batch of the season. Picky husband hates tomatoes, but he gladly accepted their tomato offer while he was over fixing grandma's computer the other day because he knows I love them! There are a lot of great tomato recipes in Tessa's book Apples for Jam and this is another one. These are suggested to be served over toasted bread, with a meat main course, or as a way to dress pasta, and that's what I did. The rosemary is also pretty special because it is my first time using fresh rosemary from my very own rosemary plant, way to go herb garden :) I've had the plant all summer but had not used it at all, now that I have my own stash I will have to be on the lookout for more fresh rosemary recipes!


Sautéed Tomatoes in Olive Oil and Rosemary
Tessa Kiros -- Apples for Jam
About 6 ripe and firm but juicy medium tomatoes
4 tablespoons olive oil
2 cloves garlic, peeled and squashed a bit
2 small rosemary sprigs
Salt and freshly ground black pepper (optional -- I left off the pepper)

Cut the tomatoes into quarters from top to bottom. Heat the oil in a large nonstick frying pan and add the tomatoes, garlic, and rosemary sprigs. Cook over quite high heat at first, until the undersides of the tomatoes are deep golden. (the golden color was a little tough to achieve for me) Turn them gently. The skins may be loosening a but, which doesn't matter - just try to keep them as intact as possible. Sprinkle with some salt and pepper if you like.


Lower the heat and cook for about 10 minutes, or until the juice from the tomatoes mingles with the oil and makes a syrup in the bottom of the pan. If the garlic cloves seem to be getting too dark, just sit them on top of one of the tomatoes. Cook until the tomatoes have a lovely color and look roasted rather than boiled. (a little unsure if I achieved this desired effect, but they were delicious so I'm not complaining) Serve warm or even at room temperature. Serves 5.


While the tomatoes were cooking I was also boiling up a pot of pasta. I drained it and tossed it with a little butter to prevent sticky noodle syndrome and ladled over some sautéed tomatoes and their delicious sauce.


Topped with some freshly shredded parmigiano reggiano, I don't think you could ask for a better filling for your pasta bowl :)

Saturday, October 29, 2011

Mini Vanilla Cake Doughnuts with Chocolate Glaze


I hope everyone is having a wonderful weekend getting ready for all of the Halloween festivities just around the corner! Today was such a fun day, we made some fun Halloween themed treats with the kids, and the favorites were these mini donuts.


The recipe is a Tessa Kiros recipe, just perfect for I Heart Cooking Clubs theme of the week, Harvest Moon -- Foods celebrating Fall's bounty/Halloween-themed foods. The recipe is for Vanilla Cake and I made the cake batter and used it in my mini donut maker, Maxim Donut Bites, pictured below...


This is an almost retro, almost vintage, okay, okay, just old, small kitchen appliance from 1995. It is still going strong. I hadn't used it in years but after seeing all of these cute new mini donut makers all over amazon and at stores I had the yearning to trudge mine out and see if it still fired up. The kids were very excitecd, and I'm sure we'll be using this thing a lot more now that they know about it.


I also broke out my new heart doughnut pans and baked a few heart doughnuts as well, but mostly the minis. I know, hearts are for Valentine's Day, but I love hearts all the time, and we heart Halloween :) The heart ones were gobbled up too quickly to photograph.


Here is the recipe from the book Apples for Jam adapted for doughnuts:

Vanilla Cake Dougunuts

1/2 pound plus 2 tablespoons butter (2 and 1/4 sticks)
1 cup plus 1 tablespoon superfine sugar -- I used regular sugar
3 eggs
1 teaspoon vanilla -- I upped this to two teaspoons
2 and 1/4 cup all purpose flour
1 and 1/2 teaspoons baking powder
3/4 cup half and half

Preheat oven to 350 or preheat your doughnut maker.

Beat butter and sugar together very well in a large bowl. Add the eggs one at a time, beating well after each one goes in. Add the vanilla and sift in the flour and baking powder. Beat well, adding the half and half a little at a time. You will have a thick and creamy batter.

Scoop it into a ziplock bag and cut small hole at the end, squirt in enough batter to fill your doughnut molds half full and bake in the oven for about 10 minutes, depending on your pan, or about 2 minutes in your doughnut maker (or follow manufacturers directions for baking) remove to wire rack and cool completely before frosting or glazing.

~~~

To top the doughnuts I made a quick chocolate glaze, I didn't measure really, but it was pretty much 1 and 1/2 cups semi sweet chocolate chips, 1/4 cup corn syrup, and 1/4 cup half and half, microwaved together for 2-3 minutes and half power, stirring vigorously after every 30 seconds. Add a little time as needed and add some extra light corn syrup if it is too thick. It should be shiny and glossy and easy to dunk the doughnut tops in -- you could also spread it on the doughnuts, just make sure to add any desired sprinkles asap so they will stick.


These ended up being the perfect snack and a perfect fun halloween treat to make with my kids and their neighborhood friend. I wish I had snapped some pictures, but it was kind of crazy managing kids and sprinkles and chocolate glaze :) Happy almost Halloween!


Tuesday, October 25, 2011

Mini Fig Cakes for Fall and Ginger Jazzed Brownies


Another Tuesdays with Dorie twofer here, just can't seem to get them up on time! This week our recipe pick was A Fig Cake For Fall, picked for us to try by Ursula of Cookie Rookie, thank you Ursula! I looked and looked for fresh figs but could not find any, so I used dried figs instead. I also switched out the lemon for an orange and made a half batch of mini cakes instead of one big one.


Here are the cakes before baking, I only had enough batter to fill five jumbo "Baker's Secret Texas sized" muffin cups.


Here are the dried figs simmering in the orange scented honey wine sauce, yum!


Here is what they looked like after baking and dusted with some powdered sugar, sadly, I let my wine sauce simmer too long and it turned into more of a thick caramel, and not in a good way, so I couldn't use it on my cakes, but the little taste I had was delicious!


I topped them with whipped cream and they were absolutely delicious, although different from their intended version, they were enjoyed. You can see that the dried figs sank to the bottom, but that was fine...


Now on to last week's recipe, Ginger Jazzed Brownies, picked for us to try by Clivia of Bubie’s Little Baker...


While I was buying fresh ginger, I saw this little jar of chopped ginger and had to give it a try. I love ginger but hate chopping it and thought the finely minced texture (almost a paste) would work perfectly in these brownies, since last time we made the chocolate gingerbread with TWD the ginger chunks were a little too overpowering for my clan. I ended up loving this jarred ginger and immediately went to amazon to see if I could order it in bulk, sadly, to no avail -- come on Christopher Ranch, sell on ammy!


The jarred ginger worked perfectly and I personally loved these brownies, they were so delicious! My kids and the neighbor kid loved them too, I heard they were "awesome!" -- which always makes a baking mommy smile. Picky husband on the other hand, poor guy was excited to try these, and I failed to mention they were ginger brownies, he took one bite and said "yuck!" and thought they were gross. Sorry, honey, I will make you regular brownies soon :)

Wednesday, October 19, 2011

Rigatoni with Tomato, Eggplant, and Ricotta


This delicious dish was my pick for I Heart Cooking Clubs theme of the week: Peasant Food.  Pasta is so inexpensive and easy to store in the pantry that it is always on hand at my house. Sometimes I go a little crazy buying fun shapes or fancy imported pastas, but for this dish I used good ole rigatoni that you can find at any supermarket; and, just maybe, right in your own pantry :)  


The kicker that really makes this dish "peasant food" is that the eggplant was free since it was from my garden!! Now, take the word garden lightly here, this was actually my first year planting any vegetables, and I just had a few plants in a small area next to my back porch.  The kids were excited to plant the vegetable plants and loved harvesting our teeny tiny crop.  Our very first garden consisted of one zucchini plant, one summer squash plant, two eggplant plants (only one of which produced), one acorn squash plant, and one jalapeno pepper plant -- that only produced one unedible gnarly little pepper.  Anyway, it was a fun experience, along with our first herb garden which we also planted this year, and we will probably try gardening again next spring.  On to the recipe...

Penne Rigatoni with Tomato, Eggplant, and Ricotta
Tessa Kiros -- Apples for Jam

1 small eggplant
salt and freshly ground pepper
5 tbsp olive oil
1 large garlic clove, peeled and squashed a bit
1- 14 ounce can tomatoes
3/4 of 1 - 16 ounce package of penne (I used rigatoni)
1/4 cup salted mature ricotta or finely grated parmesan cheese (I used 1/2 cup of regular ricotta, I can never find the hard ricotta, ricotta salata I believe it is called, and this is peasant food, right? so I used what was on hand even though it changed the recipe a little)
3 tbsp chopped fresh parsley (thank you, herb garden!)


Cut the eggplant into slices about 1/4 inch thick and about 1 inch across. Toss them into a colander, sprinkle with a teaspoon of salt, and leave them for about 40 minutes to drain off any bitter juices.

Heat half the olive oil with the garlic clove in a smallish pan over medium low heat until you can just smell the garlic. Add the tomatoes and season with some salt and pepper. When it comes to a boil, lower the heat and simmer uncovered for 15 to 20 minutes, until it all melts into a sauce. Break up any bits of tomato with a wooden spoon as you stir. Keep warm.


Rinse and drain the eggplant pieces and pat them dry with paper towels. Heat the remaining oil in a nonstick frying pan (I used my electric wok) and saute the eggplant over medium heat until it is crusty and golden in places on the outside but still soft inside.


Meanwhile, cook the pasta in a large pan of boiling salted water, following the package instructions. Drain, keeping a cup full of the water.


Put the paste in a large serving bowl. Add the eggplant, the tomato sauce, cheese, and parsley and mix together thoroughly, adding some of the pasta cooking water in the pasta seems dry. Serve immediately.  Serves 4.


I made this for lunch one day when my four year old and picky husband were home. I absolutely loved it, I think it is a wonderful recipe and would make it again for sure, and use extra eggplant since that was my favorite part.  The eggplant was amazing, I don't know if it was because it was homegrown or the preparation but this was the tastiest eggplant ever, and I adore eggplant! My four year old liked this but didn't love it.  I was very surprised picky husband was even game for trying this one, he hates most pasta but I think he was trying to be nice, anyway, he is not an eggplant fan, but said that this was the best eggplant.  He did not like the pasta...oh-well.  If you like pasta and eggplant, this is a winner recipe for sure :)

I'm sending this along to  HoneyB at The Life and Loves of Grumpy's Honeybunch for Presto Pasta Nights #236, thank you for hosting, HoneyB!

Saturday, October 15, 2011

Mini Sawdust Pies


Time for another Club: BAKED treat! This one is called Sawdust Pie, and according to Baked Explorations it was created in the late 1970s, at Patti's 1880 Settlement Restaurant (I googled Patti's and found out it is still around and going strong, and on the current dessert menu, there it was, Sawdust Pie) despite it's old timey name suggesting it is from much earlier.  It became popular after being published in a Bon Appetit magazine in the 1980s and has seemingly since fallen off the culinary map. I personally had never heard of Sawdust Pie, and was excited to give it a go.  


Since picky husband does not like pecans or coconut, both of which are in this recipe, and the kids are kind of hit or miss with new recipes I decided to halve this recipe and use my mini square tartlet pan.  The hardest part of the recipe was fitting the pie dough into the squares, which wasn't even that hard, just a bit tedious, but worth it for these cute little Sawdust Pies all the way.


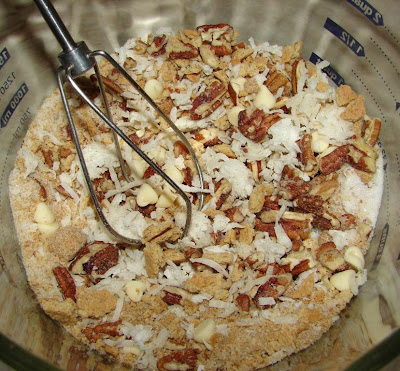
I was surprised at how little liquid goes into this recipe, only egg whites and a touch of vanilla are mixed into the dry ingredients.  Scoop the mixture into your prepared pie dish of choice and you are ready to bake.


Above is before baking and below is after. The filling rose quite a bit so I am glad I didn't over fill the crusts!


The pie is supposed to be served with whipped cream and bananas, we were out of bananas, but served with whipped cream, these little pies were absolutely delicious!  I could definitely see making these again or even the whole pie as a holiday pie, especially if you are serving this to a pecan and or coconut fan :)


A big thank you to Tessa at Cookin' Chemist for picking this recipe for us to try, you can find the recipe here at her site  if you do not have the book Baked Explorations, give this retro recipe a try for sure :)  
Related Posts with Thumbnails