Thursday, February 12, 2009

Fresh Spaghetti with Vegetarian Meatballs


I've never had a meatball, or a vegetarian meatball. I've always thought to myself I'd like to try to make them at some point but never got around to it. I think meatballs are so cute, I don't know why, maybe the song, "on top of spaghetti, all covered with cheese..." or that children's book, "Cloudy with a Chance of Meatballs", or the adorable little meatballs with eyes and smiles that are on children's menus at Italian restaurants?

If you don't eat meat or just want to try some vegetarian meatballs or "vegballs" here is a great recipe to start with. This is my take on a recipe I saw at allrecipes...

Vegetarian Italian Style Meatballs:

4 eggs
1 cup shredded parmesan
1/2 cup cottage cheese
1 cup pecans
1 teaspoon Italian seasoning
1 teaspoons salt
2 cups Italian seasoned bread crumbs (I made them with fresh Italian bread I toasted and then crumbed up in the food processor)


This is a super easy recipe that can be done completely in a large food processor.


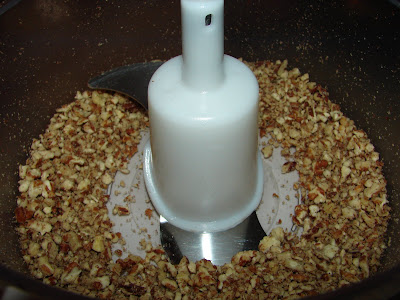
Chop pecans.

Add toasted Italian bread, about 4 slices, or 2 cups of breadcrumbs.


Add the rest of the ingredients and pulse together until well blended.


Here is what your mixture will look like, spray your hands with cooking spray or olive oil and roll into 2 inch balls.

Place balls into prepared 9 by 13 glass dish. Bake at 350 for 40 minutes.


From there you can simmer in sauce for a few minutes and serve with your spaghetti! I did use Ina's sauce recipe featured with her Meatballs recipe...

1 tablespoon good olive oil
1 cup chopped yellow onion (1 onion)
1 1/2 teaspoons minced garlic
1/2 cup good red wine, such as Chianti
1 (28-ounce) can crushed tomatoes, or plum tomatoes in puree, chopped
1 tablespoon chopped fresh flat-leaf parsley (used dried)
1 1/2 teaspoons kosher salt
1/2 teaspoon freshly ground black pepper


I added 1 tablespoon sugar, I always do with sauce, it's the way I've learned growing up -- the sugar helps with the tomato acidity...apparently. I've also heard that the sugar 'trick' is nothing more than bad advice. But I like to add it anyway.


I figured why not go all out for Barefoot Bloggers this week and make my own spaghetti. I used my lello pastamaster 3000 and the recipe on the back of Bob's Red Mill Semolina Flour ( recipe here ) + 1/2 cup bread flour. The spaghetti turned out perfectly!

Here are a couple bread shots...I made the Italian bread ( recipe here -- changes were to use 3 teaspoons yeast and bake in the oven 350 for 35 minutes after a 30 minute rise post shaping) this morning just to be able to have some fresh breadcrumbs for my vegetarian meatballs (vegballs).


The second loaf was great with our meal, and I also have plenty left for some more homemade breadcrumbs.


Now I have a special little treat to get you in the mood for Valentine's Day -- chocolates!


Don't those look wonderful? I was so excited when See's Candies asked if I would like to sample some of their chocolates and write about them here at Nummy Kitchen. Of course I would! Soon this sweetly wrapped box of chocolates arrived and we were all in chocolate heaven.


Look at that variety! I had to cut them all in half for a chocolate sampling with my three very excided little ones. Don't worry, we didn't eat the whole box at once. But we did all enjoy the homemade taste of See's chocolates. The fillings were delicious, my favorite was the ultra moist coconut, no dry stuff here, you can tell that these were fresh chocolates.


Chocolate in dino jammies, what could be better? I don't know, and neither did my youngest, he was pretty happy with those chocolates. If you are looking for Valentine's Day gifts for someone special, or for yourself (nothing wrong with that :) ), I would highly suggest See's Candies. We were all very happy with our See's chocolate treats!

I will leave you all with one last shot of my first ever meat free "meatballs" -- what a fun Barefoot Bloggers pick!

Tuesday, February 10, 2009

Floating Islands in a Chocolate Sea -- Tuesdays with Dorie


Okay guys -- here you have it, my Floating Islands. This amazing creation was chosen for 'Tuesdays with Dorie' to try by Shari of
Whisk: a food blog -- you can find the original recipe on her website or just check out pages 401-402 of Dorie Greenspan's book Baking From My Home To Yours. Thank you Shari, for opening my eyes to a whole new dessert! I'd never heard of Floating Islands and was quickly intrigued when I learned this was the recipe we were tackling for TWD.

Floating Islands are puffs of milk poached meringues usually served on Creme Anglaise -- but after reading through the recipe for that I felt compelled to skip it and just serve my islands on some home made chocolate fudge sauce that I had sitting in the fridge left over from a cake I made last week. Why skip the Creme Anglaise? Six egg yolks! Sorry guys, if you're a reader of this blog you know that I just don't like eggs or eggy sauces, etc. I do eat eggs, I don't mind them at all in a pancake, or cookie, crepe (although some crepes push my egg tolerance), or muffin...but there is just something that I don't like -- scratch that there are so many things I don't like, the texture, the smell, the sliminess, I could go on and on but this is about I will shut up. I feel so bad that I don't like eggs. I have egg guilt. Sorry eggs, even though you taste nasty to me I still try to make you for my kids because I know you are healthy and packed with omega-3s and protein, but they don't like you guys either. But my husband does, yes, the man that doesn't like anything yummy -- pecans, mushrooms, spinach, cheesecake -- he likes eggs. I guess we balance each other out right? Right. (By the way we celebrated our 6th anniversary last week :) )


Above the little clumps are the meringue I scooped off the beaters after mixing.
Okay on to the Floating Islands -- I had fun doing the meringues -- and guess what, I don't even mind meringue, love some lemon meringue pie, but anyway -- everything came together easily and I was soon ready to poach some islands, baby!


I was really excited about this part, I don't know why, just expecting something magical to happen. I guess it did. Okay, take that back. If something magical happens, I don't think you are supposed to say, "well, I guess it did." It must not have been that magical, right? If it was it would be "oh my goodness, wow" -- these were more along the -- "hey, that's kind of neat," magic. What happened was just what Dorie prepared us for, they puffed up, then shrunk back down after removing them from the milk. Mine weren't that perfectly shaped, they were fine, I wasn't disappointed, but not impressed with my island shaping either, going into this I was planning to do hearts, but that did not happen. After spooning a couple islands I decided I wasn't even going to bother with hearts, plenty more heart opportunities in the upcoming week -- or all month long, why not?

As my islands were poaching is where this all went down hill. You see, as I started simmering my milk I was taken back to a childhood memory, warm milk and honey, my mom used to make this for me at night all the time, a little treat to help me sleep. I LOVED it. I still do. She always simmered on the stove -- never the microwave -- which I sheepishly admit to making "warm milk and honey" in for my kids. Then, after the islands were done, I smelled the egg smell. Oh no, how could this be? I start to feel gaggy just at the thought of it. No egg smell...please!!! Why did you do this to me Floating Islands?!? You were going to help my start to want to try to like eggs, then you had to ruin it all with the cooking egg smell, blech.

That was pretty much it for me. I had a couple bites, it was egg. No floating islands for me. Just cooked egg. In chocolate sauce. At least I had a strawberry for garnish.

I hate to sound ungrateful for this TWD recipe -- here comes that egg guilt again. I'm sure it was just me and I will see tons of positive "oh my goodness, wow" reviews of this recipe as the TWD masses post about it. I'm hoping everyone loved this recipe, making it, and tasting it! I can say 100% that I had a fun time making these, a very fun time, I felt like I learned a new technique in the kitchen and enjoyed watching the Floating Islands evolve. Maybe someday I will like eggs, right?

Sunday, February 8, 2009

BBQ Black Bean and Corn Soup with Copycat Jiffy Corn Muffins


I love the black bean and corn combo and came up with this soup wanting to use up some black beans that I had made in the pressure cooker, then ended up freezing because I made so many I didn't know what to do with them.

I pulled out one container of the beans that I had thawed in the fridge which ended up being 5 cups, so there is the start to this soup.

Barbecue Black Bean and Corn Soup

5 cups black beans, either precooked dried beans or drained canned would work
3 cups water
1 15 ounce can diced tomatoes, undrained
2 cups frozen corn
1/2 cup of your favorite BBQ sauce
1 teaspoon seasoned salt (I use Lawry's)
1/2 teaspoon chili powder (more if you'd like)
1/2 teaspoon dried cilantro

Put all ingredients into large pot and simmer over medium high heat for 30-45 minutes, stirring occasionally.

That's all folks! Super easy, isn't it? And it was so delicious! Guess what, even the kids liked it, seriously! All three of them, miracle of miracles, ate the same dish, whoa. I served the soup with a "copycat" or "clone" recipe for Jiffy Corn Muffin Mix. The real Jiffy Muffin Mix is really popular in lots of recipes, cornbread casserole, tamale pie, etc. but did you know it has lard in it? Not so great for vegetarians. No worries though, make your own! This recipe from recipe zaar is equal to one 8.5 ounce box of Jiffy Corn Muffin Mix:

2/3 cup all-purpose flour
1/2 cup yellow cornmeal
3 tablespoons granulated sugar
1 tablespoon baking powder
1/4 teaspoon salt
2 tablespoons vegetable oil
To make muffins add
1 egg
1/3 cup milk


Combine first 5 ingredients in a bowl, mix well.
Whisk in vegetable oil and mix until dry mixture is smooth and lumps are gone.
If another recipe is calling for a box of Jiffy Corn Muffin Mix, add the above mixed ingredients to that recipe.
To make Corn Muffins, preheat oven to 400F, spray muffin pan with non-stick cooking spray.
Combine mix with egg and milk, mixing well.
Fill muffin pan 1/2 full, bake for 15-20 minutes.
(my personal preference for oven time and temp is 375 for 15 minutes for muffins)

If you are a soup fan, visit Deb Kahakai Kitchen and check out her weekly Souper Sundays event, yum! I love soups of all kinds, and being the bread lover that I am, love to pair the two. In fact, if I'm making soup, I almost always have to make a bread to go with it, just one of those things. My favorite way to eat the BBQ Black Bean and Corn Soup was with a crumbled corn muffin on top, mix it all together, mmm :)


Friday, February 6, 2009

Cranberry Baba Cakes -- Tyler Florence Fridays


I was visiting foodnetwork.com and looking for an interesting Tyler Florence recipe for the oh-so-fun online cooking group Tyler Florence Fridays and also looking for a recipe I could make with what I had on hand. I came across Tyler's Cranberry Baba Cakes. Hmmm...cranberry sounds good, cake sounds good, not sure what "baba" means -- but we'll check it out. So I read through the recipe and saw it was for little yeasted cakes, and after reading the directions I was reminded of the Kugelhopf directions that we made last November for Tuesdays with Dorie. That was a challenge indeed and I wanted to give this type of 'cake' (really more of a bread) a try.

I googled "baba cakes" and found out they are related to the Kugelhopf, and also the Babka which is more of a Slavic version baked in a tube or bundt style pan. A yeasted cake with a delicate yet rich dough with butter and egg. I guess "baba" usually refers to a French version, mini cakes with rum and dried fruit, soaked in a simple syrup or brushed with butter and the sugared with with powdered sugar (just like the Kugelhopf). Very ineteresting! I love learning the history of foods :)

Cranberry Baba Cakes

1/4 cup dried cranberries, chopped
1 cup orange liqueur (recommended: Grand Marnier), optional -- I did not use the liqueur
Melted butter, for brushing molds plus 4 tablespoons room temperature, cut into small pieces
3/4 cup warm water
1 package yeast
1 tablespoon sugar, plus 2 cups for syrup
1 egg, room temperature
1 3/4 cups all-purpose flour
1 teaspoon orange flower water
1/2 cup orange marmalade
Whipped cream, for serving

Put the cranberries and orange liqueur (or 1 cup warm water) into a small bowl and set aside.

Brush 12 baba molds, a popover pan, or a muffin tin with melted butter and set aside.

In the bowl of a stand mixer, stir together the water, yeast, sugar, and egg. Using the paddle attachment, stir in the flour until incorporated. Mix on medium speed for 6 minutes, scraping down the sides of the bowl once.

Add butter and mix on medium speed until incorporated, about 2 to 3 minutes. Cover and let rise in a warm spot for about 15 to 20 minutes, it just needs to rise a bit not double in volume.

Drain the cranberries (reserve the soaking liquid) and mix into the dough with a spatula or wooden spoon.


Fill the baba molds (or popover pan or muffin tin) half full with batter.

Let rise in a warm spot until the dough fills the molds, about 1 hour.


Preheat the oven to 350 degrees F.

Bake the babas for 20 to 25 minutes or until the tops are a deep golden brown. Remove from molds, put babas onto a rack set over a sheet pan, and allow them to cool completely.


Bring 2 cups sugar and 4 cups water to a boil. Boil for 1 minute and remove from the heat; stir in the reserved soaking liquid and the orange flower water. Using tongs or a spoon, place the babas, 1 at a time, into the sugar syrup.


Hold them under until the air bubbles stop coming out of the cakes, about 5 to 10 seconds. Drain on the rack; you can recycle the syrup that accumulates in the sheet pan. Warm the marmalade and brush it onto the tops of the babas.


To serve, split open and top with a generous dollop of freshly whipped cream.

~~~~~~~~~

Results and Changes:

I knew I wanted to try a couple in the syrup but wanted the rest 'dry' for my kids so they would not get too messy. I'm also not a huge fan of soaked baked goods so was apprehensive. I did not have the orange flower water or orange marmalade and while I'm sure those would have added another level of flavor they are not essential to these, in my opinion.

I used a baby bundt pan and a mini bundt silicone pan, I was curious to compare the two because I had heard silicone bakeware doesn't work well for yeasted doughs and I must say, after making these I completely agree. You can see in the picture below that the bigger babas were more evenly browned. Silicone will get the job done but will not brown as evenly and leave a softer crust -- which for me is perfect for cupcakes, brownies, muffins, but for a yeasted dough you want that crunchy crust.


The recipe was great, everything came together and was relatively easy. I preferred these as a roll type breakfast bun, with a little butter, than as the whole soaked in syrup and served with whipped cream deal -- although that way was good too. I think doing the Kugelhopf style finish, brushing with melted butter and powdered sugar, would be my favorite way to serve these.

My kids absolutely loved these plain, which kind of surprised me because they are not very sweet. All three little ones wanted second baba cakes after finishing their first ones. I think maybe the name helped to win them over because they were saying 'baba cakes' all morning :)

Tuesday, February 3, 2009

Cinnamon World Peace Cookies -- Tuesdays with Dorie


Dorie's famous World Peace Cookies -- how could I? How could I possibly change up this recipe that is so perfect? I didn't intend to change it up -- but the mini chocolate chips I knew I had in the pantry were missing, what to do? I had just about every chip imaginable except for mini semisweet! I narrowed it down to either regular semisweet or cinnamon chips -- the cinnamon chips were smaller than regular chocolate chips, not quite as small as mini, but I was hoping the would work. They added a nice extra element to these cookies where the stand out flavors are chocolate and salt.


But wait, that wasn't my only change...not being one patient enough to chill dough, I rolled these into little balls, flattened them slightly, and popped them in the oven. I have never been a 'slice and bake' cookie fan, don't know why, but I prefer hand rolled shapes. That's all. Promise. No more changes from me.


These were great, I think the cinnamon added so much! I am not a huge chocolate cookie fan -- give me a soft white chocolate macadamia nut and I am happy. I did like these though. They were enjoyed at our house, but they weren't 'oh my goodness wow.' I was wondering to myself, maybe I messed up the whole idea of these cookies in adding the cinnamon chips but I really don't think so, since the warmth from the cinnamon was one of my favorite facets of these.


Thank you to Jessica of
cookbookhabit, who picked World Peace Cookies, from pages 138-139 of Dorie Greenspan's book Baking From My Home To Yours. I'm so glad to finally give these a try -- even if I did change them up a touch. You can find the recipe on Jessica's site or at a million other locations on the internet, these are quite the popular cookie :)
...
Update: for some reason I think these taste better the next day! I'm really feeling the 'sable'ness (meaning sandy in French) of these. I will make them again and am envisioning flecks of maraschino cherries throughout the dough, and mini chocolate chips, that are now on the grocery list.

Monday, February 2, 2009

Homemade Lingonberry Jam Poptarts

Don't buy poptarts -- make you own! Why not? They are so easy, and even though they still don't qualify as health food, surely they are better than the over processed ones you buy from the store. The kids and I have always made them any time we have leftover pie crust (I always make a double crust, even for a single crust pie, the left over half has so many possibilities.) Alton Brown even did a poptart tutorial on his show Good Eats -- I think making your own poptarts are the new 'in' thing, I'm seeing them everywhere, and whenever I do, I feel the need to make some more of our own! I have nothing against the "real" poptarts -- but if you want to have some fun in the kitchen give these a try.

You can use any pie crust recipe you like, but you should start with one you know is pretty easy to roll and work with. For these lingonberry poptarts I used Tyler Florence's basic pie pastry recipe...

Basic Pie Pastry:

2 cups all-purpose flour, plus more for rolling
3 tablespoons sugar
1/4 teaspoon salt
1 lemon, zested (I used a 1/2 teaspoon dried lemon zest)
3/4 cup (1 1/2 sticks) cold, unsalted butter, cut into small chunks
1 egg yolk
2 tablespoons ice water, plus more if needed (I ended up using about 6

Combine the flour, sugar, salt, and lemon zest in a large mixing bowl. Add the butter and mix with a pastry blender or your fingers until the mixture resembles coarse crumbs. Add the egg yolk and ice water and work that in with your hands. (Or do the whole thing in a food processor, pulsing a couple of times to combine the dry ingredients, then pulsing in the butter, and then the egg.)

Check the consistency of the dough by squeezing a small amount together between thumb and forefingers: You want there to be just enough moisture to bind the dough so that it holds together without being too wet or sticky. If it's still crumbly, add a little more ice water, 1 teaspoon at a time.

When you get it to the right consistency, shape the dough into a disk and wrap it in plastic. Put it in the refrigerator and chill for at least 30 minutes.

~~~

Each batch of pie crust will yield 6-8 poptarts. Just roll out to about 1/4 inch thick (maybe a touch thicker) on a prepared baking sheet and cut with a pizza cutter or sharp knift into a rectangle shape.


Then cut into large sections from top to bottom, you will be folding these over so make them twice as long as you want your poptarts. Don't worry about each piece being perfectly even, I didn't, as you can see below :)

Spread some jam on each half of the dough, and fold the non-jammed side over.
Seal the edges of your poptarts with a fork, and the bake in a 350 oven for about 12 minutes, you will have to watch from there, it really depends on your pan whether it is single ply or double ply (aka insulated) I prefer insulated sheets to do poptarts on so the bottoms don't get overly brown. They could take as long as 17 minutes -- it also depends on the pie crust recipe you use. Just keep the oven light on and peek through the door and when you see the edges getting light golden brown take them out of the oven.

Cool them on the pan for a few minutes and then carefully remove them to a cooling rack with a spatula or flipper.

To make the icing use about 1 cup powdered sugar and 1 tablspoon milk. Stir together, if it is too dry add milk about 1 teaspoon at a time while stirring until you get a smooth slightly thick but spreadable icing. This is easy to do in a mug with a fork. You don't really even have to measure, just eyeball it.

Have your sprinkles or nonpariels ready and spread the tops of the poptarts with icing and sprinkle the tops with sprinkles before you go on to frosting the next poptart. If you try to frost them all at once before adding sprinkles the icing will harden just enough to make the sprinkles not stick.
This is such a fun and easy activity to get the kids in the kitchen. Keep some prepared pie crust in the fridge and let the kids pick their favorite jam or other fillings and their own sprinkles and let them help along the way. They will love their personalized homemade pop tarts!


Update: I just noticed my Blogging By Mail friend Shaheen at The Purple Foodie made some delicious looking strawberry poptarts with fresh strawberries -- yum! Go check them out, I bet you will definitely want to make you own poptarts after seeing those :)
Related Posts with Thumbnails