Friday, June 12, 2009

Cinnamon Swirl Bread -- Tyler Florence Fridays


Today for Tyler Florence Fridays I made Tyler's Wonderful White Bread with a cinnamon sugar swirl. I've missed the last few TFF round-ups since we've been so busy lately, and couldn't wait to participate again.

Tyler's Wonderful White Bread

1 cup milk
3 tablespoons butter
1 package (1 tablespoon) rapid-rising dry yeast
2 tablespoons
sugar or honey
3 cups unbleached all-purpose flour
2 teaspoons salt
2 egg whites, divided and slightly beaten
1 tablespoon sesame seeds (I skipped these since I was doing the cinnamon swirl)

In a small saucepan, heat the milk with butter over low heat just until the butter melts. Remove from heat and add to the bowl of a standing mixer fitted with a dough hook. Proof the yeast by adding it to the warm milk and butter. Add the sugar and stir gently to dissolve. Let stand 3 minutes until foam appears. This indicates the yeast is active. Turn mixer on low and gradually add the flour. When the dough starts to come together, increase the speed to medium and add the salt and 1 egg white. Stop the machine periodically to scrape the dough off the hook. Mix until the dough is no longer sticky, about 10 minutes.

Turn the dough onto the work surface and knead for a minute or so by hand. Knead by folding the dough over itself and pushing out with the heel of your hands, not down. Rotate the dough and repeat. The dough is properly kneaded when you can pull it and it stretches without breaking. Form the dough into a round and place in an oiled bowl, turn to coat the entire ball with oil. Cover with plastic wrap or a damp towel and let rise over a gas pilot light on the stovetop or in another warm place until doubled in size, about 45 minutes. Test the dough by pressing 2 fingers into it. If indents remain, the dough is adequately risen.

Once the dough is doubled and domed, turn it out onto the counter. The act of turning out the dough naturally deflates the gas, so there is no need to aggressively punch it down. Handle the dough gently, overworking the gluten at this point will produce a dense loaf that is difficult to shape. *To form a loaf, pat the dough into a rectangle, fold the long sides to the middle then fold under the ends. Pinch the seams closed and place in a greased 9 by 5-inch loaf pan, seam side down. Make sure the dough touches all sides of the pan.


Cover with plastic wrap and let rise a second time for 20 minutes or until the top of the dough is nearly level with the top of the loaf pan.


Preheat oven to 350 degrees F, place a large pan on the bottom rack of the oven. Bring 3 cups water to a boil on the stove. Pour the hot water into the preheated pan to create a steam bath for the bread. This will make a crisp crust.

Slash dough down the middle of the loaf with a sharp knife to allow the steam to escape during baking. Brush the top with remaining beaten egg white and sprinkle with sesame seeds. Bake the bread for 30 to 40 minutes until crust is golden and internal temperature reads 195 degrees F when checked with an instant read thermometer. The bottom of the loaf should sound hollow when tapped. Immediately remove the bread from the pan and cool completely on a rack.


* Variation: To make Cinnamon-Raisin Swirl Bread: after the first rise, press the dough out to a rectangle


sprinkle surface with cinnamon and raisins to cover (no raisins for us today)


Roll up like a jellyroll, pinch the seams closed and continue as directed in the recipe.


We loved this bread, especially the kids who asked me if I would make it every day :) Will have to try it as plain white bread next time, this seems like a perfect sandwich bread, soft with a nice chewy crispy interior, yum!

Thursday, June 11, 2009

Curried Couscous and Tofu Veggie Kabobs -- Barefoot Bloggers


Time for Barefoot Bloggers! Thank you to Ellyn of Recipe Collector and Tester, who picked Ina's Curried Couscous as our first recipe for the month of June. I love couscous and couldn't wait to try this recipe. I decided to make some tofu veggie kabobs to go with the couscous, couscous and kabobs, what a perfect pair! I did make a few changes, noted next to the recipe, this is such an easy recipe to personalize with what you have on hand or to personal tastes.

Curried Couscous
The Barefoot Contessa Cookbook

1 1/2 cups couscous
1 tablespoon unsalted butter -- skipped the butter
1 1/2 cups boiling water -- used vegetable broth
1/4 cup plain yogurt -- used sour cream
1/4 cup good olive oil
1 teaspoon white wine vinegar
1 teaspoon curry powder
1/4 teaspoon ground turmeric
1 1/2 teaspoons kosher salt -- cut down to 1/2 tsp because of the broth
1 teaspoon freshly ground black pepper -- skipped
1/2 cup small-diced carrots
1/2 cup minced fresh flat-leaf parsley -- forgot :(
1/2 cup dried currants or raisins
1/4 cup blanched, sliced almonds -- used 1/3 cup pistachios instead of almonds
2 scallions, thinly sliced (white and green parts) -- left out
1/4 cup small-diced red onion -- left out


Place the couscous in a medium bowl. Melt the butter in the boiling water and pour over the couscous. Cover tightly and allow the couscous to soak for 5 minutes. Fluff with a fork.

Whisk together the yogurt, olive oil, vinegar, curry, turmeric, salt, and pepper. Pour over the fluffed couscous, and mix well with a fork. (I actually added my mix-ins before the dressing...)

Add the carrots, parsley, currants, almonds, scallions, and red onions, mix well, and season to taste. Serve at room temperature.

Yum!

Now on to the kabobs, they are so easy and delicious, and always get me into a summer fun mood :) I adapted this recipe from a recipe that came in the instruction book with my indoor electric grill. The original recipe was for Teriyaki Chicken Kabobs but I just switched the chicken for tofu and swapped the onion for mushrooms.


Teriyaki Tofu Veggie Kabobs

Marinade:
1/2 cup soy sauce
1/4 cup sherry
3/4 cup brown sugar (this was a little too sweet, so I might decrease the brown sugar a touch next time)
2 tablespoons vegetable oil

1 garlic clove, pressed
1/2 teaspoon powdered ginger

1 block Nasoya extra firm tofu, cut into approx. 1 inch cubes, drained well on paper towels
3 bell peppers -- I used red, orange, and yellow
1 small package of whole button mushrooms
1 can pineapple chunks, drained


1. Mix marinade ingredients together.

2. Prepare veggies, clean and cut peppers into approx. 1 inch pieces.


3. Marinade tofu for at least 30 minutes, I did it in a zip lock bag.

4. Skewer the tofu and veggies, make sure if using wooden skewers they have been soaked in water for at least 30 minutes.


5. Place skewers on preheated grill (350) rotating every 5-10 minutes and brushing with excess marinde, for 15-20 minutes, until desired doneness.

This was such a delicious dinner! The kids especially had fun making their kabobs. The kabobs and couscous went so well together, what great flavor combinations.

Tuesday, June 9, 2009

Parisian Apple Tartlets -- Tuesdays with Dorie


First off, get ready for picture overload, I just couldn't stop snapping photos of these tartlets! A huge thank you to Jessica at My Baking Heart who picked these simple and delicious treats for Tuesdays with Dorie, what a great choice!

This is a very simple recipe, puff pastry, apples, brown sugar, and butter, that's it! My challenge to myself was to finally make my own puff pastry. Honestly, I don't shy away from many recipes, but puff pastry has always seemed so 'out-of-reach' for my culinary capabilities. I don't know why, because really, it's not that hard!


After much rolling and folding, and a ton of butter (4 1/2 sticks!) -- we have puff pastry -- yay!


But, would it puff? Would I get a big schlopy mess of dough that resembled raw pie dough? I was so nervous!


Here is my test tartlet...


Before and after baking...


Ta-da! Look at that puff! It puffed, it puffed! Yay for puff pastry! No more Pepperidge Farm for me :)

Time to make a few more delicious dainty tartlets. I decided that the extra butter on top was not essential to a perfect apple tartlet...but after seeing how much butter went into that puff pastry I don't think skipping a few butter dices matters at all.


Before and after baking again...


I'm just so amazed that the puff pastry turned out! The apple and brown sugar were amazing and even my super picky husband who usually doesn't care to try TWD treats stole two of these as soon as they got out of the oven and loved them.


But really, how could anyone not want a bite of that buttery, flaky, apple-y, brown sugar goodness? Just look at those layers!


I can't wait to make some apple turnovers with my leftover puff pastry, and yes, I have quite a bit left, I'd sure hope so after 4 1/2 sticks of butter!! I hope everyone else had as much fun as I did with this recipe. I can't wait to see all of the tartlets posted for Tuesdays with Dorie, I'm sure there were a ton of creative takes on these, sometimes I like to shake things up a bit with TWD but my family really enjoyed these as written, simple Parisian Apple Tartlets :)


Sunday, June 7, 2009

Bear's Peach Cobbler -- Sweet Melissa Sundays


I'm so excited -- today is my day to pick a recipe for Sweet Melissa Sundays! I chose Bear's Peach Cobbler from The Sweet Melissa Baking Book because peach cobbler is one of my favorite desserts and I couldn't wait to give Melissa's recipe a try. Also, I thought it was neat that Melissa mentions before the recipe that she first made this for her little sister's fifth birthday and it ended up being her favorite dessert. I'm an only child and when I was younger always wished for a little sister. I'm sure if I had one I'd be in the kitchen creating desserts either for or with her all the time :) I hope that my fellow SMS bakers enjoyed this recipe, I can't wait to visit everyone and see how their cobblers turned out.

I used California Summer White peaches (they look like apples when sliced and have an amazing flavor) and skipped peeling them...

Bear’s Peach Cobbler
Serves 6 to 8

Ingredients for the cobbler topping:
1 cup all-purpose flour
1 teaspoon baking powder
1/4 teaspoon kosher salt
2 tablespoons sugar plus 1 1/2 teaspoons for sprinkling
1/2 teaspoon freshly grated lemon zest
2 tablespoons cold unsalted butter, cut into 1/4-inch pieces
1/2 cup heavy cream
1 tablespoon whole milk or heavy cream, for glazing

Ingredients for the peach filling:
6 cups peeled, sliced, ripe peaches (bout 3 1/2 pounds)
Juice of 1 lemon
3/4 cup sugar
2 tablespoons cornstarch
1/2 teaspoon ground cinnamon

Directions:

1. In a large bowl, whisk together flour, baking powder, salt, 2 tablespoons sugar, and zest. Using a pastry blender, cut in the butter until it resembles a coarse meal. Little by little stir in the heavy cream until dough starts to hold together (a bit more cream may be used if needed).

2. Turn the dough out onto a lightly floured work surface. Pat dough together to form a round about 1/2-inch thick. Using a lightly floured 2 1/2-inch round biscuit cutter (I just a heart cookie cutter) to cut the dough into 7 to 8 biscuits.


3. Place biscuits on a cookie sheet lined with parchment or aluminum foil and refrigerate loosely covered with plastic wrap, while you make the filling or until you are ready to use.

4. Preheat oven to 350 degrees F. and butter a 2-quart ovenproof deep-dish pan. Line a cookie sheet with parchment or foil.

5. To make the filling, stir together peach slices, lemon juice, sugar, cornstarch and cinnamon in a large bowl.


Pour peach mixture into prepared dish.


Place the biscuits evenly on top of the peach mixture and brush with milk. Sprinkle with remaining sugar.


6. Place dish on the lined cookie sheet and bake for 1 hour and 15 minutes or until biscuits are cooked through. Remove to a wire rack to cool before serving. This cobbler should be eaten the day it is baked. Serve warm with vanilla ice cream or whipped cream.

*My cobbler is still baking, I just wanted to post the recipe early for SMS, I can't wait to report back with results, which I think we will love! Thanks for visiting :)


Update: Yum, yum, yum! This cobbler was wonderful, I had never used white peaches in cobbler before and they turned out great. My kids all absolutely loved this, my super picky husband is not a peach fan, but he tried it and said it was really good, even though he only wanted a little taste. What a delicious Sweet Melissa Sundays treat!


Look at that gorgeous rosy peach color from the SummerWhite Peaches, I love it!

Tuesday, June 2, 2009

Cinnamon Squares -- Tuesdays with Dorie


Time for Tuesdays with Dorie! Our treat of the week this week: Cinnamon Squares, picked by the wonderful Tracey of Tracey’s Culinary Adventures, you can visit her fun blog for this recipe. Thanks for a great pick, Tracey! I can't believe I'm posting so late, I like to usually write up my TWD post the night before and set it to post at midnight, but I wasn't able to make today's recipe until this morning. Good thing it was an easy one!

Cinnamon squares is a very basic recipe, I did change up a few ingredients though...I substituted buttermilk for the whole milk, I love the little something that buttermilk adds to baked goods and I had some to use up in the fridge so I thought, why not?

I also substituted cinnamon chips for the chocolate chips in the middle layer, and for the espresso powder, I subbed in instant French vanilla nut coffee.

The cake baked up and was done at 40 minutes, I used a standard 8 by 8 by 2 pan by wilton, I love that Dorie mentions in the recipe that she uses a basic Baker's Secret square pan, which are easy to find at just about any store that has a baking aisle. I have a few Baker's Secret pans and love them. I skipped the parchment paper and sprayed my pan with Crisco spray with flour for baking, no sticking problems, thank goodness!


For the chocolate frosting I used semisweet chips and melted them with the butter and added a few tablespoons of cream to give it a more ganache look.

The frosting spread easily with an off-set spatula, I tried my best to get it to look all swirly like in the book...

And that is all! A simple, moist, and very cinnamon-y snack cake :)

Monday, June 1, 2009

My Kitchen My World -- Pakistan


Pakistan was our second random destination with
My Kitchen My World for the month of May. I knew nothing about Pakistani cuisine so this was a fun challenge to see what recipes I could come up with and try out.

I found a recipe for
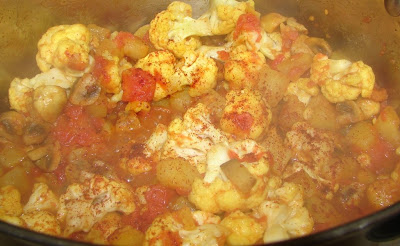
Phool Gobi Mushroom Ka Salan while googling Pakistani recipes, and thought it sounded like a delicious lunch. One of the ingredients, "zeera-rye" had me stumped but after some sleuthing I learned that in Iran and Pakistan, cumin is called zeera. Not sure about the "-rye" -- but I went with cumin.

Phool Gobi Mushroom Ka Salan
adapted from khanapakana.com

1 small cauliflower cut in to florets
200 grams mushroom
2 small potatoes cubed
1 medium tomato cut into pieces
1/2 teaspoon zeera-rye (which I think is cumin)
1/2 teaspoon chili powder
1/4 teaspoon turmeric
4 tablespoons vegetable cooking oil (I used some ghee that I made for a curry dish a while ago)
Salt to taste -- I used about 1/2 tsp kosher salt

1. Heat oil (or ghee) in pan, add zeera-rye (cumin) and potatoes.


2. When half cooked, add cauliflower, mushroom, tomato, chili powder, turmeric powder, and salt.


Getting steamy...

Getting spicy...

3. Cover and cook on medium low, stirring occasionally.
4. If required add a little water. *I would probably add stock or broth next time.
5. Continue cooking until the potatoes become tender.
6. Decorate with lemon wedges and coriander leaves if desired.
7. Serve hot with rice.

I cooked up some of my favorite imported basmati, doesn't it look so light and fluffy?

All done! What a delicious lunch.
I also made some Chapati Roti, a quick whole wheat tortilla like Pakistani bread.


Chapati Roti
adapted from Fauzia's Pakistani Recipes

1/2 cup whole wheat flour
2/3 cup all purpose flour
1/2 cup water
1/4 teaspoon kosher salt

Knead all ingredients together for about 10 minutes. Let rest about 10 minutes. Break off 1-2 inch pieces and roll or flatten until very thin. I found the best way to do this was between two sheets of plastic wrap sprayed with Pam. Cook over medium high heat on griddle until golden brown spots appear. Flip over and wait for golden brown spots on the second side.


These are really easy to make, very chewy and great to dip up sauce.

If you'd like to cook along with us as we travel the globe, check-out My Kitchen My World :)
Related Posts with Thumbnails