Tuesday, May 18, 2010

Apple Apple Bread Pudding & Classic Strawberry Tart


This week for Tuesday's with Dorie, Elizabeth at Cake or Death? decided on Apple Apple Bread Pudding as our treat to try. Thank you Elizabeth, I absolutely loved this delicioius bread pudding! I am a new fan of bread pudding, I used to be scared off by soggy bread and eggy custard, but have found a "formula" to adapt recipes for those of us who still think bread pudding sounds good -- but would prefer it a little more solid. When we made the Chocolate Bread Pudding for Tuesdays with Dorie I tried using 3/4 recipe of the bread and 1/2 recipe of the custard, so more bread and less custard. Now I do that with any bread puddding recipe I try, and I've been pleasantly surprised with every bread pudding that comes out of my oven.


I used homemade brioche and crock pot apple butter (made with apple sauce) for this recipe. The apple butter was great and I'd never even thought about making it on my own before this TWD pick. I do love the stuff and have fond memories of it, Mussleman's Apple Butter had been a pantry staple growing up and I loved it on bagels as a kid. Nice to know I can now make my own, and next time around, it will hopefully be with homemade apple sauce :)


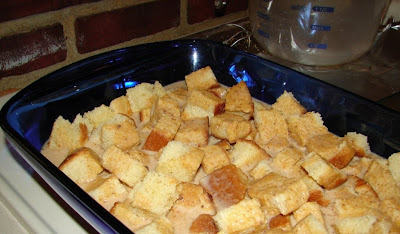
Was this how the bread was supposed to be placed? Since I only used 9 ounces of bread and overlapped a little more than I should have, I didn't have enough bread to sandwich the caramelized apples, so I just put them on top, and broke up my last piece of brioche and stuffed it in around the edges.


Whoa Nellie, that's a lot of custard, and that's after halving the custard recipe!


Not to worry, it baked up perfectly! What a yummy dessert, I thought it was especially delicious with some whipped cream and grade B maple syrup, mmm. Sadly, I couldn't convince picky husband on this one, and the kids only liked the apples and picked them out, oh-well.


Last but not least a quick photo of the Quick Classic Berry Tart, picked for us to try last Tuesday by Cristine of
Cooking with Cristine -- so sorry I didn't get a chance to post this last week even though I baked along. Picky husband liked it, although he did say it wasn't as good as strawberry shortcake, and the tart was a huge hit with the kids :)


Sunday, May 16, 2010

Pumpkin Bread Pudding with Caramel Rum Raisin Sauce


This amazing recipe is from The Sweet Melissa Baking Book and was picked for us to try with Sweet Melissa Sundays by Carmen of Baking is My Zen, thank you Carmen! I am a new lover of bread pudding, I used to not like the stuff, but after baking Chocolate Bread Pudding for Tuesdays with Dorie and Almond Brioche Bread Pudding for a previous Sweet Melissa Sunday and fiddling with the custard to bread ratio, I've become a huge fan. Turns out I never liked bread pudding because the few times I'd tasted it, I was overcome with mushy bread and eggy custard, two things I can't stand. So now I always up the bread to custard ratio -- I usually do 1/2 recipe of the custard and 3/4 recipe of the bread -- and am rewarded to a delicious bread pudding!

One of my favorite parts of making bread pudding is making my own bread for it. This recipe called for brioche, mmm!

Oven toasted cubes of brioche are then covered with a pumpkin spice custard -- in the recipe you are to use fresh ginger chunks and cinnamon sticks and strain the custard, I just used ground cinnamon and ginger to eliminate the straining.


Before baking...

After baking...note the crunchy cinnamon sugar topping, yum!


The bread pudding is then served with an amazing caramel rum raisin sauce, that starts out with caramalizing sugar, adding cream, and then adding raisins soaking in spiced rum, absolutely delicious!


This has got to be one of my new favorite desserts, it would be perfect served during the fall or even at Thanksgiving, and I'm so glad we got the chance to try it now :)

Tuesday, May 4, 2010

Penguin Waffle Sundaes with Burnt Sugar Ice Cream


This week for Tuesdays with Dorie our recipe selection comes from Becky of Project Domestication, she picked Burnt Sugar Ice Cream. You can find the recipe here at her site, thank you Becky! I absolutely love when we make an ice cream with TWD, it gives me that nudge to take out the ice cream maker, which sadly, is one of my lesser used kitchen appliances. No real reason why either, it works perfectly and we love ice cream. I guess I just never think to bring it out until I'm reminded by TWD :)


This ice cream came together beautifully and was pretty easy to put together. I'd say the toughest part is when the burnt sugar, or caramel, seizes up when you are adding the cream and milk mixture while making the ice cream base. You have wait for it to soften back up and combine with the liquids while constantly stirring. I have to admit I did have a bit of a sloshing and a little mess to clean up on the stove top due to some over zealous stirring -- tsk, tsk -- but it was well worth it in the end.


Above is the ice cream base just after being poured into the ice cream maker. Below it is just about done churning, yum!

We love waffles for breakfast, and using them as bases for desserts is another wonderful waffle application. Enter penguin waffle sundae featuring burnt sugar ice cream...even this Red Wings fan couldn't resist :)


So fun! The kids loved these, and I have to admit I loved them too!

The penguin waffle maker bakes the sweetest little penguin waffles with a big dip in their bellies to pile on the syrup and butter, ice cream, fresh fruit, etc. Happy breakfast dessert!


Sunday, May 2, 2010

Peanut Butter Truffles & Strawberry Rhubarb Cobbler Pie


It's Sunday -- time for Sweet Melissa Sundays! I missed posting last Sunday so I have two treats to share from The Sweet Melissa Baking Book by Melissa Murphy. First off, for this week's selection, Mara of Love Your Mother picked these decadent Peanut Butter Truffles (recipe here). A big thank you to Mara, who has an amazing craft and food blog, very fun!

This recipe had me racking my brain, trying to remember the last time I made truffles, and I don't think I've ever really made them before! I've done different kinds of coated candies but never true truffles. This recipe didn't work out perfectly for me, I got a few decent truffles, after letting the truffle mixture sit in the fridge for six hours (recipe recommends two) my truffle mixture was still too soft to roll. I popped it in the freezer for a little bit, and ended up firming it up enough to be able to roll some truffle balls. As soon as they were rolled, you could tell they needed to go back in the freezer, they were flattening and just too soft.

In the recipe you are to roll the truffle directly into chopped peanuts, but I decided to do a candy coating (wilton candy melts) since they were so soft, and then sprinkle the peanuts on the candy coating shell. This worked for about 7 truffles, before the balls were too soft to coat in the candy coating, getting all gloppy and just making a mess. Kind of disappointed in my attempt at these, I should have been able to make 50 or so truffles with all of the ingredients but most ended up tossed out because they were just too soft. Now I'm thinking I could probably have beat in some powdered sugar to stiffen them up, oh-well. I'm pretty sure the other Sweet Melissa Sunday bakers had a better go with these. At least I did get a pretty few to photograph, and of course they were delicious :)

Last week's recipe was an amazing Strawberry Rhubarb Cobbler Pie picked for us to try by Tracey of
Tracey’s Culinary Adventures, you can find the recipe here at Tracey's site, along with some amazing food photography :)

I absolutely love fruit desserts, and putting a biscuit cobbler topping on a pie is a genius idea! I had so much fun making this recipe. The end result was oh so delicious, but quite a bit runnier than I typically like my pies. I even doubled the cornstarch before baking because I noted others had trouble with the pie being too runny on the SMS site, to no avail. It was still enjoyed and I'm for sure going to try a cobbler pie again :)

Saturday, May 1, 2010

Bean Griddlecakes with Spiced Rice and Coconut Curry Sauce


This week's theme at I Heart Cooking Clubs is Spice Caravan, and I had a great time coming up with some spicy Mark Bittman dishes. I started out making Bittman's Rick with Chickpeas and made the Spiced Rice with Chickpeas and Almonds variation.

Spiced Rice with Chickpeas and Almonds
adapted from Mark Bittman's How To Cook Everything Vegetarian

1 tbsp olive oil -- I used ghee
1/2 tsp onion powder
1/2 tsp garlic powder
1 tbsp curry powder
1 and 1/2 cups chopped ripe tomato with juice or canned (don't drain) -- I used Muir Glen Fire Roasted
1 cup vegetable broth (I ended up needing a full 14 ounce can to cook the rice properly) -- I used Swanson Vegetarian Vegetable broth
1 bay leaf
Salt to taste
1 1/2 cups long-grain rice -- I used Roland Basmati
1 cup cooked chickpeas (garbanzo beans) -- Mark says you can use drained canned or cooked dried
toasted sliced almonds
*we also added about 1 cup of raisins

Heat the ghee (or oil) in a large pot and add the spices and cook for a minute or so. Add the tomato, stock, bay leaf, and some salt, bring to a boil.


Stir in the rice and chickpeas (garbanzo beans), cover, and turn the heat down to low so that the mixture bubbles gently. Cook until the liquid is absorbed and the rice is tender, about 20 minutes. Fluff with a fork and adjust seasonings if necessary.


Stir in the raisins if using, top with almonds. Serve warm or at room temperature.


I had originally planned to just make the rice, then for leftover lunch the next day I decided to make Mark's Bean Griddlecakes. You can use any bean, and since I had a bunch of garbanzos after slow cooking 1 lb of dried, I decided to use those up in the Griddlecakes.

Curry Chickpea / Garbanzo Bean Griddlecakes
adapted from Mark Bittman's How To Cook Everything Vegetarian

2 cups cooked or canned drained beans
1 1/2 cups skim milk
1 egg
2 tbsp melted butter
1 cup flour
salt to taste, depending on beans
1 tsp curry powder

Set a skillet or heat an electric griddle (what I use) to 375. Put the beans in a large bowl and mash them roughly. Stir in the milk, egg, and butter, stir until combined.

Add the flour and sprinkle with salt, stir until well combined. It should be the consistency of thick pancake batter. Working in batches, scoop out about 1/3 cup of batter onto griddle to make 3-4 inch griddlecakes. Cook until the bottoms are lightly browned, about 4 minutes per side. Serve hot or at room temperature.


I had some leftover spiced rice and garbanzo bean griddlecakes, and thought a curry sauce would be perfect to tie everything together. I made my super quick version of a coconut curry sauce and it went really well with the rice and griddlecakes.

Quick Coconut Curry Sauce

1 can coconut milk (14 ounces)
2 tbsp butter or ghee
2 tsp curry powder (you can start with 2 and up as desired, or use 1 tsp for a lighter flavor)
1/2 cup shredded coconut


In small sauce pan over low heat melt butter and coconut milk. Let it come to a low simmer and add in the curry powder. Simmer on very low for at least 10 minutes or until desired thickness, stir in shredded coconut before serving. Spoon over rice, griddlecakes, steamed veggies, etc.


This was all so delicious together, definitely the most flavorful meal I've had in a long time, and so many textures too. This last picture looks like a huge plate full of food but it was only 1/2 cup of the rice and two bean griddle cakes, but after adding the curry sauce and toasted almonds it looks gargantuan! It reminds me of a Thanksgiving dinner plate, filled to the brim with yummy food and then smothered in gravy :)


Friday, April 30, 2010

Homemade Russian Noodles -- Lapsha


I just had to try this recipe for homemade Russian noodles called lapsha. I love making pasta and dumplings and have never made a noddle like this before. To me they are almost exactly like those frozen Reames Egg Noodles, which I had often growing up. I even froze a couple of freezer bags full of these noodles, uncooked, and then was able to successfully cook them from frozen! What a great item to have on hand in the freezer for those days where you crave a comforting noodle dish.

I had not heard of lapsha before this recipe and did some looking around online trying to figure out what they were supposed to look like and to compare recipes. Some people refer to lapsha as a simple noodle and broth soup, while others specifically called the noodles themselves lapsha. I think that traditional lapsha are thinner, but I just was not able to get those super thin noodles by hand. I even hauled out the pasta roller, but this dough would not cooperate with that at all. Back to the rolling pin, I figured I'd just roll them as thin as I could and cut them with a pizza cutter into rough rustic pasta shapes, and even if they weren't technically perfect lapsha, I tried my best :)


Here are the lapsha ingredients as listed in the recipe:

1/2 cup boiling water
1/2 cup melted butter
1 1/2 teaspoons salt
6 large eggs
5 cups all-purpose flour (I probably used 6 1/2 - 7 cups of flour total)

Here are the base directions from the recipe:

To a large saucepan, add water and bring to boil.
Add butter to boiled water and let dissolve, whisk well to blend; let cool to warm.
In a large mixing bowl, add salt, eggs and beat well.
Gradually add water/butter mixture to eggs and whisk well to blend.
Add flour to egg mixture, 1/2 cup at a time, mixing well after each addition.
Place dough on a lightly floured surface and knead for about 10 minutes.
Cut dough into pieces to form dough balls the size of a medium orange.
Cover dough balls with a damp cloth while rolling out dough.
Using a wooden rolling pin, roll each dough ball until paper thin or as thin as possible.

*I bet you could do the kneading in a large food processor (14 cup), with a stand mixer dough hook, or in the bread machine pan just on the knead cycle -- which is what I did and it worked out well, that way I could keep watching it and adding more flour as needed to get to the right pasta consistency.

I got it a bit thinner than the above photo, below are my rustic lapsha pasta shapes...


After all of the dough was done (this is a big project, you need at least two hours) I knew I wanted cook a small batch of the noodles for lunch but was unsure of what to do with the other noodles, do I dry them? I was a little nervous about drying them with so many eggs in the dough so I decided to dust them very gently with flour and portion them out into ziplock freezer bags.

The noodles we had for lunch were simply amazing, I served them Russian style with butter and sour cream. They had a nice texture and chew to them and were just delicious. I did try a frozen bag of noodles, and much to my surprise they were just as delicious as the ones I cooked fresh, just needed a few extra minutes of cooking time (I'd say about 15 minutes total). I am so happy to have tried these and have a feeling I will be making them again as soon as we run out of the freezer stash. These delicious noodles were my pick for My Kitchen My World -- Russia, if you like trying your hand at new cuisines, come cook along!

Thursday, April 22, 2010

Baked Penne with Feta and Olives -- I Heart Cooking Clubs


This week at I Heart Cooking Clubs the theme was Pot Luck, and let me tell you, I bet this would be one of the first dishes to 'clean out' at a pot luck because it is so delicious!


After seeing Deb's yummy pot luck pasta dish I had a serious pasta craving and paged through Bittman's How To Cook Everything Vegetarian until I found a suitor -- Baked Ziti! Bittman calls this old school baked ziti with red sauce a short-cut to lasagna and a pot luck staple -- perfect :)

In the preface to this recipe he says, Whatever you do, don't overcook the pasta! It should be too tough to actually eat when you mix it with the sauce, which will make it perfect after baking.

There are a few variations of the basic recipe listed and I went with the Baked Ziti with Goat Cheese and Olives version, but swapped the ziti for penne and swapped the goat cheese for feta. In the variation you are to swap out the original 1 lb mozzarella in the recipe for the goat cheese, and being the cheese lovers we are, I decided to just use 1/2 the mozzarella and half the goat cheese amount (as feta) so we got some of both cheeses.

Baked Penne with Feta and Olives

3 tbsp olive oil
1 tbsp minced garlic (I used 5 cloves of roasted garlic, smashed)
1 - 28 ounce can tomatoes, chopped, with their liquid (I used two 14 ounce cans of San Marzanos)
1 lb ziti or other large cut pasta (penne worked well as a ziti substitute)
1/2 lb mozzarella
1/2 lb crumbled feta
1/2 cup freshly grated parmesan
1 cup pitted olives, in large pieces (I mostly halved them and quartered a few)

Bring a large pot of water to a boil and preheat the oven to 400.

Add the olive oil to a large pan, add the garlic and cook for a minute or so, then add the tomatoes and olives, bring to a boil. *I added 2 tbsp sugar to the tomato sauce, I was brought up on and love a sauce with a touch of sweet* Turn the heat down so that the mixture bubbles and gently cooks, stirring occasionally, while you cook the pasta; don't let the sauce get too thick.

Cook the pasta until just tender; it should still be too hard to eat. Drain it, don't shake the colander, let some water still cling to the noodles. Toss the pasta with the sauce and about half of the mozzarella and feta.


Grease (or spray with cooking spray) a large 9 by 13 baking dish and pour or spoon the pasta mixture in. Top with the remaining mozzarella and feta and the parmesan.


Bake until the top is browned and the cheese is bubbly, 20 to 30 minutes.


This was such a flavorful dish, even with such minimal ingredients. I absolutely loved it the first night. Those who tried it loved it too, but some people, like picky husband, could not be persuaded to try this because of the (small!) hunks of tomato and, gasp, black olives. Sigh. I almost always have to make two meals because he is so picky. Oh-well. This is one of my new favorite baked pasta dishes and I can't wait to try Mark's other variations. I don't know how anyone could pass on this one, it smelled amazing with the the garlic and the feta, who can resist a cheesy saucy baked pasta?

Related Posts with Thumbnails