Thursday, March 31, 2011

Pasta Peperonata


This week at I Heart Cooking Clubs we have started a new season cooking with a new chef, Jamie Oliver. I made Pasta Peperonata, this is the first Jamie Oliver recipe I've ever tried and it was a hit! I found the recipe here at his website and it sounded too good not to try, especially since I had six bell peppers in the fridge, and was not quite sure what to do with them.


Pasta Peperonata

recipe from Jamie Oliver -- my adaptations in italics

2 red peppers, deseeded and sliced

2 yellow peppers, deseeded and sliced

extra virgin olive oil

sea salt and freshly ground black pepper

2 red onions, peeled and finely sliced --I left these out and added in two orange bell peppers in their place, so 6 peppers total for me

2 garlic cloves, peeled and grated

2 handfuls of fresh flat-leaf parsley, leaves finely chopped, stalks reserved -- I used a few shakes of dried parsley

2 tablespoons red wine vinegar or balsamic vinegar -- I used pomegranate infused red wine vinegar -- seems like I always buy these flavored vinegars but don't often find uses for them even though I love vinegar

2 handfuls of grated Parmesan cheese

optional: 2 heaped tablespoons mascarpone cheese or crème Fraîche

455g/1lb rigatoni, penne or spaghetti

Put all the peppers in a large frying pan over a medium heat with a little olive oil and a pinch of salt and pepper.

Place a lid on, and cook slowly for 15 minutes until softened. Don't rush this too much, as cooking the peppers slowly like this really helps to bring out the flavour.


Add the onion and cook for a further 20 minutes. Then add the garlic and parsley stalks and toss around, keeping everything moving in the pan. Cook for about 3 minutes most. Have a little taste, and season with a bit more salt and pepper.


Add the vinegar - it will sizzle away, so give everything a good toss. Then add one handful of the grated Parmesan and the mascarpone or crème fraîche if you are using it and turn the heat down to minimum while you cook the pasta.


Meanwhile put a large pot of salted water on to boil. Add the pasta to the boiling water and cook according to the packet instructions. When cooked, drain in a colander, reserving some of the cooking water. Put the peppers, pasta and parsley leaves into a large warmed bowl.


Give them a good toss together, then add a little of the pasta cooking water and a few good lugs of extra virgin olive oil to coat the pasta nicely. Serve straight away sprinkled with the rest of the Parmesan.


~~~ end of recipe ~~~


This was so delicious! I love peppers but usually like them better just slightly sauteed and still crunchy, so I wasn't sure if I would love these or not but I did. The vinegar was just wonderful in this, and all of the flavors went together so well. Even though I added an extra two peppers (six total instead of four), I think I could have added a couple more (maybe two greens?) -- this has me thinking this will be a perfect recipe in the summer time with all of the garden fresh bell peppers!
So, my first Jamie Oliver recipe was a huge success, and guess what? Even the kids liked this! Can't wait to make it again.

Friday, March 25, 2011

Norwegian Waffles


Our My Kitchen My World destination for the month of March is Norway and I decided to make some traditional Norwegian waffles. Norwegian waffles are usually made on a heart shaped waffle iron, thinner than the Belgian waffles we are used to for breakfast here in the USA. Waffles for breakfast in Norway are a real treat, and are often served for dessert. If asked what food most reminds me of my visit to Norway years ago, I'd have to say waffles.


Norwegian Waffles
Mrs. Olson's Norwegian Waffles, recipe from ehow

4 eggs
1/2 cup sugar
1 cup milk
1 cup sour cream
2 cups flour
2 teaspoons baking powder
1 stick butter melted
1/2 teaspoon cinnamon


Heat the waffle iron.

Crack the eggs into a bowl, add the sugar and whisk together.

Add the milk and sour cream and whisk, again mixing well.

Add the flour, baking powder, cinnamon and mix gently.

Add the melted butter and mix well. Pour batter into waffle iron. Cook for 4 minutes or until timer goes off.


~~~

These waffles were absolutely delicious, soft and tender, just like a Norwegian waffle should be. My kids gobbled them up with some whipped cream and sugared lingonberries and said this was one of their favorite waffles, no one even asked about maple syrup!

I had been wanting to try some Ski Queen Gjetost cheese, which has a caramel color and is made with goats milk and imported from Norway. I ordered a tiny square online for $11. From what I've read this cheese is supposed to be very thinly sliced with a cheese knife and served with toast or crackers, or over warm waffles to melt slightly. A little goes a long way!

My kids weren't crazy for the gjetost, but when I tried it I found the taste very familiar, I know I've had it somewhere before, perhaps Norway? I just didn't remember or realize what it was at the time. Some say it's an acquired taste, but I liked it. I don't think I'll be ordering it often, but it was nice to give it a try.

All in all, a very fun Norwegian breakfast! I'm sure I'll be making these waffles often, they really surprised me with how tender and flavorful they were. Until we take the family on vacation to Norway, these will do just fine :)

Wednesday, March 23, 2011

Spaghetti Marinara with Vegetarian Meatballs


I Heart Cooking Clubs is saying farewell to cooking celebrity chef Giada de Laurentiis recipes and moving on to Jamie Oliver recipes. The theme of the week is Arrivederci Giada, and I finally tried Giada's Marinara Sauce, a recipe I've had bookmarked ever since we started cooking with Giada.


Marinara Sauce
recipe from Giada de Laurentiis my changes in italics

1/2 cup extra-virgin olive oil
2 small onions, finely chopped --
I left out the onions and added 1 tsp onion powder
2 garlic cloves, finely chopped --
I used roasted garlic, four cloves
2 stalks celery, finely chopped
2 carrots, peeled and finely chopped
1/2 teaspoon sea salt
1/2 teaspoon freshly ground black pepper
2 (32-ounce) cans crushed tomatoes --
I used two 28 ounce cans and one half 14.5 ounce can
2 dried bay leaves


In a large casserole pot, heat the oil over a medium-high flame. Add the onions and garlic and saute until the onions are translucent, about 10 minutes. Add the celery, carrots, and 1/2 teaspoon of each salt and pepper. Saute until all the vegetables are soft, about 10 minutes.

Add the tomatoes (I was out of San Marzanos -- which I have to order online since they are not available locally and happened to buy Dei Fratelli brand tomatoes at local mega grocery Meijer -- they were pretty good) and bay leaves, and simmer uncovered over low heat until the sauce thickens, about 1 hour.

Remove and discard the bay leaf. Season the sauce with more salt and pepper, to taste. (The sauce can be made 1 day ahead. Cool, then cover and refrigerate. Rewarm over medium heat before using.)


I made some vegetarian meatballs (recipe here) to go with the marinara, my kids love vegetarian meatballs and it is a fun dinner for us to make together. This time I switched out the usual pecans in the recipe for cashews and it was a nice change of pace.

Giada's marinara did not disappoint, it was a light, mild marinara sauce -- and went great with the vegetarian meatballs :)

I'm sending this post on to Claire of Chez Cayenne who is hosting Presto Pasta Nights #206 -- thank you, Claire!

Tuesday, March 22, 2011

Honey Nut Brownies


It is Tuesday and that means Tuesdays with Dorie! I've missed the past couple of recipes (the muffins, which sounded lovely, will be making them soon!) and am glad to be back to baking with these Honey Nut Brownies.

These were picked for us to try by Suzy of Suzy Homemaker, thanks, Suzy! You can find the recipe for these brownies here if you do not have Baking From My Home To Yours and want to give these a try.


I baked these up this afternoon as an after school snack and they were a big hit. My two boys loved them and my daughter liked them but wasn't too keen on the nuts at first -- she later changed her mind and declared she loved these brownies, nuts and all. I used hazelnuts and kept them whole, which I like, but next time I think I'd chop them since these are a more cakey brownie and whole nuts seem to work better for me in dense fudgy brownies.

My only tiny change was to use an extra ounce of chocolate -- five instead of four. I thought these soft and thick brownies were great with some tea -- note the kettle on the range :) I would make these again for sure, I really enjoyed the honey chocolate flavor combo. Below photo is in front on my daughter's pink backpack and on top of a kindergarten workbook, which just happened to be sitting on the kitchen table, how's that for staging and after school snack?

Sunday, March 20, 2011

Irish Soda Bread -- Sweet Melissa Sundays


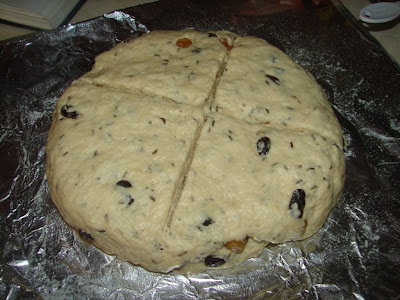
Time for Sweet Melissa Sundays! Our recipe of the week is Irish Soda Bread, picked for us to try by Julie at A Little Bit of Everything -- thanks, Julie! I had been feeling a little unmotivated in the kitchen the past couple of weeks, we've just been so busy with field trips and school events that there was no time for playing around in the kitchen. Yesterday this Irish Soda Bread gave me the little nudge I needed to get back into the kitchen :)

You can find the recipe for this Irish Soda Bread here at Julie's site if you do not have The Sweet Melissa Baking Book.

I've made Irish Soda Bread a few times before and every recipe is a little different, this one calls for golden raisins and currants, I was out of currants, so just subbed in regular raisins along with the golden ones. This recipe has an optional 2 tablespoons (yes, that is a lot!) of caraway seeds. I debated adding them for a minute, but then figured, why not? I had them on my spice rack and don't use them often, so in went the full 2 tbsp. My first thought was uh-oh, too many caraway seeds, but in the end I ended up liking them.

Unfortunately, picky husband and the kids were not fans of the caraway seeds :( I loved them and loved this bread, much more than I thought I would. As a young child growing up, we always bought bread from the local European bakery and tasting this bread took me right back to sitting around the kitchen table with my mom and grandma having caraway bread and butter.

Before baking shot above, and all sliced up below. What a perfect March pick! This is probably my personal favorite Irish Soda Bread, although with the family not liking it, not sure when I'll get to make it again. A couple recipe notes -- I did mix this bread up in my food processor before kneading in the raisins, and also, I had to add an extra 10 minutes on to the baking time.

Friday, March 11, 2011

Beggar's Linguine


Time for French Fridays with Dorie! Today's recipe is Beggar's Linguine and let me tell you, I was so excited to give this recipe a try. You know how when you first page through a new cookbook and one recipe stands out to you, well this was that recipe for me with Around My French Table. It just sounded so delicious and like such a new combination of flavors and textures -- and it's pasta -- one of my very favorite foods.


To do this dish justice I had to make fresh linguine. Then I got the add-ins ready; pistachios, almonds, figs, and instead of raisins (we were out) I used dried Michigan montmorency cherries. Not pictured is the zest, I used the zest of a Minneola Tangelo, which was a nice bright orange -- and also the freshly grated parmigiano reggiano.


Please excuse the bad photos of this recipe, hubby had been messing around with the camera settings and I hadn't switched them back before I started shooting and didn't notice they were not quite right until I uploaded them.

Above, the add-ins are simmering in butter.

This was such a yummy lunch. I am happy I used fresh pasta as I think that really helped make this a special dish. Kids weren't too keen on this dish, oh-well. I thought it was great, and it was nice to use some figs, which I like but always forget about. Another delicious dish with the FFwD gang :)

Sunday, March 6, 2011

Four Veggie Pizza


This was an "everything but the kitchen sink" or "clean out the fridge" type pizza that turned out really yummy! The veggies are from Sam's Club, and I know this pizza would be even tastier using fresh from the garden veggies this summer, can't wait :)


Four Veggie Pizza

your favorite pizza dough
your favorite pizza sauce
fresh mozzarella log, about half, sliced into rounds
generous 1/2 cup crumbled goat cheese
red, yellow, and / or orange bell peppers, thinly sliced -- I used baby bell peppers
2 small tomatoes, sliced, I used Campari tomatoes -- yum!
about 5 large mushrooms, sliced
about 5 jumbo black olives, thinly sliced

Spread desired amount of pizza sauce on pizza crust, I used a homemade crust, but I bet this pizza would be great with a Boboli crust.

Distribute slices of mozzarella on top of sauce, then sprinkle goat cheese crumbles evenly over the mozzarella, covering any big exposed areas of sauce.


Place veggies on top.


Bake on a baking sheet or pizza pan for about 15 minutes at 415, or until crust is nicely browned on the bottom. I like to bake on a preheated baking stone at a higher oven temperature, around 550 (should preheat stone for at least 30 minutes, I like to preheat the stone for about an hour). The fresh mozzarella and goat cheese don't brown too much, so you have to check your crust for doneness with this pizza. Enjoy!

Chocolate Puddings and Coconut Custard Pie -- Sweet Melissa Sundays


Our pick for today's edition of Sweet Melissa Sundays is Chocolate Pudding, picked for us to try by Leslie of
Lethally Delicious -- thank you, Leslie! I just made something similar, Chocolate Pots de Creme for TWD, and the recipes were very close. I only made of half batch of the TWD Chocolate Pots de Creme, it was a huge hit and the kids were asking when I would make them again, so I was happy to make a full batch (6 ramekins) of the SMS Chocolate Pudding pick and excited to give this recipe a try.

I prepared the custards, my only change to the recipe was to whisk in 1/4 cup of Hershey's Special Dark cocoa powder to give in an extra chocolate punch since it looked a little pale. I then got my water bath ready, covered my pan with foil, and put these puds in the oven for one hour, the full recipe baking time. When I took them out they looked a little funny, but I wasn't worried, I thought it might have just been from the extra cocoa powder. I then discovered I totally messed these up by having the oven set at 350 instead of the 300 the recipe called for, I had to go check the oven temp and realized my error but it was too late for these puddings. They were inedible and just utterly disgusting. I couldn't believe I had ruined them :( I would have made a second batch but used up the last of my eggs for the first batch. I will have to try these again soon. The Butterscotch Puddings we made for Sweet Melissa Sundays were amazing and I'm sure that the chocolate recipe is wonderful too, I'm sorry I messed these up...Oh-well, what can you do?

As I was uploading my pudding fail photo, I noticed a couple photos of a Sweet Melissa Sundays pick from last May that I baked along on but never posted about -- Coconut Custard Pie, picked for us to try back then by the bakers at
I Dream of Baking (click for recipe). So I figured I'd post these along with my poor puddings that didn't turn out. This pie was delicious, I love coconut but am not usually a custard pie fan, but gave this recipe a go anyway and it was so so yummy. If you are a coconut custard pie fan give this a try for sure :)

Wednesday, March 2, 2011

Strawberry Mango Spring Rolls

I made Giada's Fruit Spring Rolls recently and thought they would be perfect for I Heart Cooking Clubs' theme of the week, Spring Fever. These are a fun springtime snack and were quickly gobbled up by my little ones.


Strawberry Mango Spring Rolls

slightly adapted from Giada's recipe

1 1/2 cups cooked Pad Thai noodles, cooled and drained*
1/4 cup honey
1/4 packed cup fresh mint leaves, finely chopped
6 (8-inch) rice paper rounds
6 medium strawberries, stemmed
1 mango, halved, peeled, seeded and cut into 1/4-inch thick slices

For the rolls: Put the noodles in a medium bowl and add the honey and the mint.

Using 2 forks, toss the ingredients together until the noodles are coated. Lay a damp kitchen or paper towel on a work surface. Soak a rice paper round in warm water for 20 to 30 seconds until softened. Put the rice paper on the damp towel. Add 1/4 cup of the noodle mixture in the center of the rice paper and form into a 3 by 2-inch rectangle. Using a paring knife, slice a strawberry lengthwise into 1/4-inch slices.

Arrange the slices over the noodle mixture. Arrange 2 to 3 mango slices on top. Roll the rice paper around the filling and seal the ends with a little water. Repeat with the remaining ingredients. Wrap the finished spring rolls in damp paper towels and store in the refrigerator. End of recipe.

Happy taste taster above, the kids had fun disassembling the spring rolls and eating all of the parts separately :) These were a neat new twist on the spring roll. I had most of the ingredients on hand, only having to buy the strawberries, mangoes, and mint. I order the Pad Thai noodles in bulk on amazon, and I have a ton of the spring roll wrappers that I had ordered online last year, and have only made one batch of rolls (Vietnamese Spring Rolls) with, so it was good to use some of those up. I will be on the lookout for more Spring/Summer Roll recipes (or any recipe to use these wrappers up) so if you have a favorite, please share!

Tuesday, March 1, 2011

Chocolate Pots de Creme and Toasted Almond Scones -- Tuesdays with Dorie


Running a little behind on Tuesdays with Dorie posts, so here is a catch up post. Our TWD pick is Chocolate Pots de Creme, chosen for us to try by Christine at
Black Cat Cooking, thanks Christine! I was a little nervous about these, thinking they might be too eggy for my liking, but they were not eggy at all, just very chocolaty and with a great pudding consistency. It was nice to get to use my new ramekin set, they are labeled 5 ounce, but I filled them with four ounces of water just to test out their volume and 4 ounces fits in there perfectly, don't think 5 ounces would work without overflow. Thank goodness they were just the right size for a half batch of Chocolate Pots de Creme.


Chocolate Pots de Creme: recipe here


Next up is last week's TWD pick, Toasted Almond Scones, picked for us to try by Mike at Living Out West , thanks Mike! I love scones and almonds and couldn't wait to give these a try. Instead of making two rounds of dough, I made one big round for some jumbo scones.


I topped them with some turbinado sugar and they baked up beautifully. They were absolutely perfect with a cup of mint green tea and I enjoyed the flecks of almond, providing a nice little crunch. Loved them!


Toasted Almond Scones: recipe here


Whew, it is nice to catch up! I was late making the scones since we had the ice storm power outage last week. I made both TWD treats yesterday, so fun to be back playing in the kitchen :)

Related Posts with Thumbnails